Friday, July 31, 2015

The Winter Garden

Our garden is still doing well despite the cold wet winter days.

The section of this year’s plot that has not been planted yet is continually being increased with stable scrapings (note the bags we collect free from the stable gates in Matamata, in the next plot to the left), ash from our wood burner and the ‘empties’ when I clean out the chooks nesting area. It is then dug over with a fork and raked. This keeps feeding the garden with nutrients and helps keep any weeds that might pop up, at bay.


We have been eating silver beet leaves when stirred into soups, casseroles and stir-fries, if not quickly steamed and served with a little butter. The plant was one transplanted from the old garden, so it was good to see it survive.


There has also been the occasional meal off the transplanted broccoli plants left over from the old garden and safely regrowing after the shift.

And I am pleased to say that we have had our first meal off a couple of the new broccoli plants and despite them being home grown, there were no caterpillars (Katrina) and when served at our annual mid-winter feast there was none left over. I try not to use any pesticides in the veggie garden as I am still not convinced they are safe even if the correct period of ‘waiting’ is adhered to and they are washed thoroughly. This means in the heat of summer, there is often a long process of picking out the caterpillars when they are being prepared to eat and sometimes they will still fall out upon cooking. If I have still been amiss they may still end up on one’s plate, an event Katrina will never miss telling me so.

It was lovely to go and harvest some greens from the garden for our meal with the family and even more of a joy to have young Natalie help with the carrying of the basket.

One of the bonuses of having the garden run amuck and the parsnips going to seed last summer is that there are lots of self-sewn parsnips coming up and those that I have let grow are now just coming on ready to eat. We are even having a little side serving of salad leaves from the lettuce plants, when I peel off some of the outside leaves allowing the plants to continue to grow and mature.



Tuesday, July 14, 2015

Another hat....

This time for a friend.

In a post from earlier this year I shared about one of my Pinterest boards called "Things I want my Mum to Make" and the little earflap hat I crocheted for one of my granddaughters.

Our minister and wife have just had their first grandson and the minister's wife thought it would be really nice if she could give an earflap hat to him especially as it will be winter in the USA, where they live, when Noah will be six months old.

She came around and we hunted through my bag of leftover balls of wool and she found a couple of colours she liked.

It didn't take long to make up especially as I had already made the first one and I knew not only how to make it but the best way to make it nice and thick and warm.

I used some left over double knit wool but a smaller crochet hook than last time so the stitches were closer together and so thicker...

This meant the tension was different so I actually had to undo it a few times to make sure it was going to be big enough.

To make it bigger I just had to increase the number of 'increase' rows at the crown before starting the rounds with no increases that would then make the sides of the cap.
Then it was just a matter of making up the ear flaps starting at the right position in the hat.

This time I made a woggle to go on the ties so the hat could be secured under the chin by pulling it up but still having the ties joined in a loop. This is so that if the hat slipped off it would just hang round the neck.

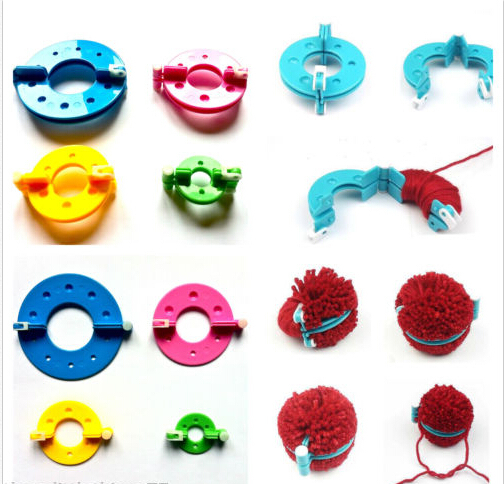
And then to finish, I made a nice thick pompom.

When I was a child, I was given a kit (similar to the one in the pic) as we often give to young girls who like doing crafty things and I made pompom toys many years ago. I have kept the plastic 'frames' and they are really handy now for making pompoms for finishing off outfits instead of having to thread wool round and through a couple of circles of cardboard..

Wednesday, July 8, 2015

The New Zealand Wood Pigeon


Pigeon by any other name, the New Zealand wood pigeon is known as the Kuku or Kukupa in the far North, but the Kereru by the remainder of the country except on the Chatham Islands where it is called the Parea.

When we were sorting out the plum tree after the leaking spouting and then the kitchen window, Harry spied in the neighbours privet tree a wood pigeon. It was having a wonderful time feasting away on the berries and enjoying the sun shine. We figured it was one of the reasons why we are often pulling out the privet trees that seem to sprout up around the section - trees known to aggravate asthmatics (and my sinuses).

But I couldn't resist taking some pics of it.

Tirau’s history is recorded as a town known as a resting place for the travellers on their last stop from Auckland or the north before travelling by horse pack over the Mamaku Ranges to Rotorua before the railway line opened up.

It is also reported that the Wood Pigeon came to rest and to feed on the berries and flowers of the Cabbage trees.

Early Maori spoke of Tirau as a wonderful place to catch the Kereu or native pigeons. The birds would feed up and become very heavy and reluctant to fly off so were easy prey.

The birds used the many Cabbage trees in the area as overnight resting places and large parties of Maori came and gathered them at night.

For this reason Tirau is also known as the catching place.


Very interestingly the Kereru is still a sort after delicacy by some, since I have taken these photos, even though it is a Native protected bird.

Ngapuhi elder Sonny Tau has stepped down as the chairman of Tuhoronuku - the iwi group charged with negotiating a Treaty of Waitangi settlement with the government - while he's under investigation.

Tuesday, July 7, 2015

Chelsea Pancakes

As a family we have always liked having pancakes or large pikelets for a breakfast or lunch time treat.

We will also use a pancake batter in the waffle maker rather than the standard recipe for waffles that requires the separation of egg white and beating them, then folding them in - something my cherubs have not wanted to do when whipping up a quick snack for themselves.

We usually use a recipe from an old Edmonds cook book or one of Alison Holst's but I thought I would try this recipe that came in one of the New World mailbox drops.

It is actually from the Chelsea Baking Club website and can be found here.

Ingredients
1 cup self raising flour
2 Tbsp white Ssgar
½ tsp finely grated lemon zest
1 cup milk
1 egg, lightly beaten
30g butter, melted

Method
Sift the flour and sugar into a bowl.
Make a well in the centre of the dry ingredients.
Mix together the lemon zest, milk, egg and melted butter
Add to the dry ingredients and whisk to combine.
Heat a large non stick frying pan over medium low heat and grease lightly with butter or oil.
For each pancake, place 2 tablespoons of batter into the pan.
Cook for 2 minutes or until bubbles form on the surface. Turn and cook for a further 1 to 2 minutes or until the pancakes are cooked through.

We have found the first pancake/pikelet always seems to not turn out right and yet with a few adjustments to the temperature of the pan the rest are fine. (the first test is for the cook!)

I served these with sliced banana and a sprinkling of lemon juice and some sugar. And I must say they were rather nice.