Showing posts with label Craft. Show all posts

Sunday, August 4, 2019

Natalie's Cardigan

With the winter months I have finally found time to finish knitting a cardigan for one of my grand-daughters.
I started it way back in April and unfortunately days were busy and so its taken far too long to complete. Hopefully she will get some wear from it before it becomes too hot for winter woollies.
The pattern required a change in stitches in every row so it was not an easy pattern to follow but it makes a nice diamond affect.
Unfortunately when I went shopping for the buttons I just took some wool rather than the garment and I think it may have needed bigger buttons. But she may not actually wear it done all the way up so might be fine. I can always stitch the button holes so they are a bit smaller if needs be.

Now onto the next one in grey but I am changing the pattern to have more plain rows and little mountain shapes.

Interesting the photos are all of the same cardigan just some with a flash and some not!

Tuesday, November 20, 2018

One of My Inspirations


Today being the last days of spring with summer just around the corner New Zealand has experienced a cold snap with snow in the South Island and today we had thunder and rain and its certainly gone cold again!

We had been scheduled to go to Matamata to an appointment but were rung this morning to have it changed to later this week, but we needed a few things urgently so went anyway. One thing I was wanting to pick up was the latest edition of a new magazine I have fallen in love with. Its a little treat about 8 times a year that I get for myself.


Daphne’s Diary is a simply lovely magazine full of fun things like crafts, recipes, hobbies, hints, patterns, free stickers, cards and booklets etc. And the illustrations are all water painted – just enchanting.

Daphne (yes she is a real person) is married with two children and has created this magazine from her diary about her own life and experiences. She lives in the Netherlands

As I flicked through and read things that caught my eye at first glance, I was encouraged in her sharing all that is normal and natural for her and I thought that’s a bit like what this blog is about.
I also read a couple of other blogs and peoples Instagram’s and realized I read them to keep up with people’s lives, especially if they live overseas and I can’t just pop around to see them.

My phrase at the top is “Something about nothing and everything God sends me." This blog too is just things that happen and are of interest to me and almost magazine form in pixels.
A few people have inquired as to whether I still write it and I know a couple of others like to read it to keep up with what is happening in my life as they are not on facebook (not that I put a lot on facebook.)

So I am inspired to spend more time posting things for you to read (or not)...
Until next time, I hope you too are inspired to take time to enjoy the things you are inspired by.

Saturday, June 20, 2015

Lady Bug Jumper

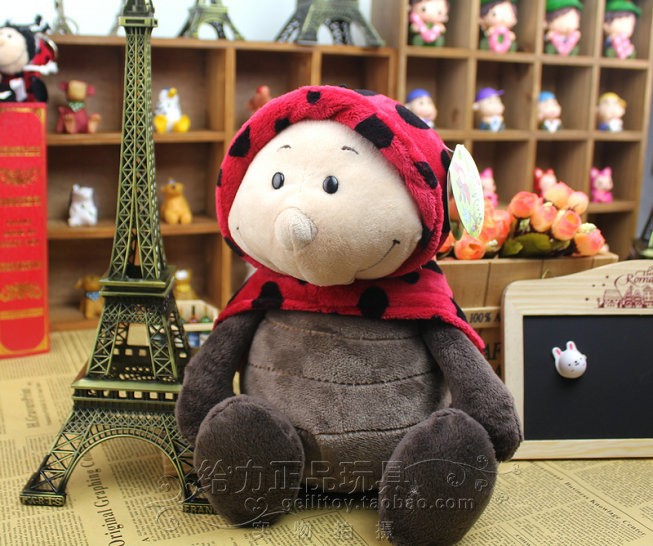
One of my beautiful granddaughters was given a ladybug toy similar to this one when she was just a baby and she has made it her special "baby" that goes everywhere with her if she can. And because she really loves it and all things to do with ladybugs her mum found a pattern for a jumper with ladybugs crawling all over it.

The original pattern had a repeat of the the front design with the ladybugs crawling all over mirrored on  the back and some on the sleeve.
However after completing the front we decided that the back could be left plain as Natalie wouldn't see the back This also meant I was able to finished a lot quicker. I also made my own positioning of some ladybugs on the sleeves.

I just used the pattern of the vertical bug coming up from the waistband at the bottom right, going up on one sleeve and down on the other making sure that the positioning of them were sort of on the front part of the sleeves.(and remembering when I was sewing it up which side the sleeves needed to be!)

Not knowing if it would become hard to take on and off and knowing that some children struggle with tops being tight when being pulled over their heads, I left an opening at one shoulder and crocheted  around the opening making two loops for button holes. I also managed to find some ladybug buttons at Spotlight just for fun,

With a fore thought that she will want to wear it often we decided to use an acrylic so that it could be easily washed and quickly dried often. I used 4 Seasons Stallion 100% acrylic from Spotlight which is an 100gr ball of 8 ply.

Needless to say Natalie was quite impressed and when she was allowed to try it on she promptly found her "baby" and just settled into it, pointing out the ladybugs with delight.

It is a little big at the moment but this allows room for a full years wear. So she will be able to wear it now and even next winter if she doesn't grow too big.

Mind you I have known acrylic knitted items do tend to stretch a little so it may well grow with her for a year!

Sunday, October 27, 2013

Number Six is Coming

Grandchild I mean.

Yes our eldest, Theresa and her partner Steven, are now in the family way and their first little cherub is due in March next year, so I have been busy with the needles and sent them their first little something from Mumsey.

I little pair of booties 

Its so exciting watching our family grow more and more each year.

So theirs will be our sixth grandchild and there are still two of our own cherubs who are not really at the stage of starting a family of their own yet, so who knows how many we will be blessed with having.

God is good.

Saturday, October 26, 2013

Card Making

Now that I have made more space in my office and actually have three desks set up (one for the sewing machine, one for paper work, letter writing etc and one for crafts) I can now go into the office and do anything I fancy as its all set up ready to go.

A couple of weeks ago I decided to start on some greeting cards. I have made the odd one or two in the past, mainly Christmas ones but I am keen to start using all the bits and pieces I have collected over the years to make cards, scrapbook and other activities and I am getting into it all, more and more. In fact now that I have started its like I can't wait to get on to the next craft or activity.

And as there is only a set number of hours in the day it has also meant that some other things have had to go by the way. One is my computer time, not such a bad thing in the run of life, but it has also meant I haven't been blogging much or catching up with my blogger friends.

But the plus is I have a few things to add so there should be a few entries over the next few days just to keep you up with the play so to speak.

So here is the first. It could really be used for any occasion and has the obvious them of love. I have left a greeting off it so that I can add that when I have decided what I want to send it for.
 
This second one was one I made especially for my sister for her birthday. One of the reasons I didn't blog it when I first made it was because I didn't want her to see it before I sent it!


And then time just caught up with me.

I have used old cards of pictures from desk calenders for both of them. The other items are just bits I have in a box.

I actually enjoy making them and I will think about who I will send them to and make it special in some way for that person.

Sunday, September 29, 2013

Poppet

"What?" you ask.

A dear friend, Rose, gave me a bag full of balls of wool and old patterns when she was tidying out her house because she had to move into something smaller with family.

One of the pattern books was a Fontana booklet of 11 Baby Cardigans (number 94) in black and white. It had cardigans in 3 and 4 ply wool.
I imagine it is a similar book that perhaps my mother and grandmother would have used to knit cardigans for me when I was small.

But really the designs don't date as its just the colours that dictate the fashion.

I really liked the style called Poppet and thought one of my grand-daughters would enjoy it.

I had some left over pink 4 ply wool from some baby jackets I had made and thought I had enough to make the cardigan. I started on it getting the fronts and back completed within a week, only to discover by the sleeves that I wasn't going to have enough wool. Never mind, I thought, I'll visit Spotlight again thinking as long as I used the new ball for the sleeves it shouldn't be too obvious that it wasn't wool in the same batch number.

However the colour is no longer made. I hunted three spotlight stores, on their website and the website who produce the yarn, Trade Me and even my bags of wool scraps to see if I could find anything the same, but alas no where to be found.

Reluctantly I purchased a ball in the closest colour of the same ply in the same brand. I started with the cuffs in the same colour as the rest of the cardigan and then finished the sleeves in the new colour.

I felt the difference was so obvious but my daughter thought it took a good look to notice.  Even if it just becomes a home or daycare cardigan it will still make her "look a real poppet in it"


I must admit knitting things for little ones give such satisfaction as they don't take a lot of time - as long as you just get on with it!

Monday, August 5, 2013

Apple Fascinators

Earlier this year I helped out a good friend, Sheryn, with the NZ Tree Croppers Association annual conference. I actually ended up being the "House Mum" for all those who stayed at the accommodation we organised. It was held by the Waikato branch in Hamilton and had an apple theme. Titled "Grow Your Own" those who were part of the organizing team on the days of the conference wanted to be identifiable from other participants so ideas went around as to how this could be done.

Caps with apples or hats were suggested and someone came up with the idea of an arrow through an apple.
I took on the task of creating something that could be worn and seen from maybe the other side of the room and the idea of a fascinator 'grew' in my imagination.

I found some plastic apples at a few $2 shops and I bought some feathers and pipe cleaners. We printed off some 'leaves' with the G Y O letters and 'Waikato' that was part of the logo for this years conference to make them unique for the conference.


With bits of ribbon, paper, plastic net and the things I had bought, I set to work with a glue gun creating a small production line of fascinators with the help of Sheryn. We made 8 in the end and it took until late that night - the night before the conference started.


They may not have looked like much sitting along the counter...

But once worn they seemed to take on their appeal.
Some had combs to slip into your hair while others had hat elastic so they could be worn anywhere on the head really.


In fact I only ended up with one of them to take home by the end of the conference.

Once person had even wanted to buy them!

Monday, July 15, 2013

Gift Boxes

These are a lovely little gift box that can used for any occasion when you  want to give a little gift.
I have made them for Christmas and mid-winter dinners but they could be used for any occasion even as for favours at a wedding.

I used old Christmas cards for these ones and you could use any occasion cards for your theme or craft card of different colours and patterns.

There is no gluing required so it is a bit like origami but there is a little bit of cutting required.
They are best made on a flat service.

You will need scissors, a ruler and pencil along with the cards you are using.

Cut an exact square from your card.
This will be the top/lid of your box. The box will be a third of the size of square you shape. That is, if you cut a 9 cm square your box will be 3 cm square.

Cut another square about 1 cm smaller than the top/lid in white card or the colour of your choice for the bottom/base of you gift box.
If you are using ‘used’ cards check that there is no writing on one side (the outside) of the card as this will be seen when the box is made up. (ie if someone has written a letter and used the back of the card you may have to find other card or make sure the middle of the white card is blank.)

Fig 1

Find the middle of the squares.
Either fold in half creasing very slightly; opening and folding again in the opposite direction. Or draw, on the inside, in pencil from corner to corner diagonally on both directions.

Fig 2
Step 1:
Fold and crease the four corners to the middle of the square being exact so there is no over lapping. (Figs 1 & 2)
Fig 3


Step 2:
Fold the sides in half to the middle, crease, open up and repeat for the other sides.  (Fig 3)


Fig 4

Now open up again and note the pattern of creases you have made. (Fig 4)


Step 3:
Holding the square in a diamond way and using the scissors, cut along the creased lines to the right and left of the point/corner of the diamond, closest to you, to the point that will be the corner of the box.
It will look like you have cut through two 'segments' of the fold pattern.

Fig 5


Rotate the square 180⁰ and repeat the last step making sure you are cutting the opposite corner of the box! (Fig 5)
Fig 6


Fig 6 shows the 'taggy' bits referred to below and a clearer view of the folds.


Fig 7


Fig 8

Step 4:
Now refold the points/corners that have not been cut to the middle (Fig 7) and then fold in half again as at the beginning, (e.g. Fig 3)  allowing the second fold to sort of ‘stand up’. (the side of the box e.g. Fig 8)


Step 5:
Fold the two ‘taggy’ bits (as shown in Fig 6) at the end of these folds, inwards so they line up with the base of the box.

Fig 9

Step 6:
Fold up and over the 'pointy' end that you have cut so the point/corner folds into the base of the box and lines up with the points/corners already in there. (Fig 8)

Fig 10
Turn the box and repeat step 6 on the opposite end. (Fig's 9 & 10)


Repeat steps 1 to 6 with the bottom/base white square.
This box (the base) will end up smaller so that the top/lid can slip over it. (Fig 11 & 12) 


Fig 12


Fig 11

You can see in the fig 12 that the white card I used had some writing on it and it shows so this is the area you need to check when choosing card to make sure it is blank.
As you can see by the red of the card in the lid only one side of the card you use needs to be free of writing etc as it will be the 'outer', as the other side  will be completely hidden.

If you want, you can glue the points to the base (at step 6) so the boxes will be a little more secure (and so people can't see what you have used!!)


Friday, January 11, 2013

Peg Bag


When I was pregnant with our second child we lived in Upper Hutt in the south of the North Island and Harry worked for the New Zealand Railways. We lived in a railway house in a private railways road so employees of the NZR would often pass by. One day I was hanging out some washing and unknown to me one of Harry’s bosses drove past our house as I was bent over picking up pegs from the ground in my rotund state. Later that boss told Harry he should make me a washing trundle/trolley so I didn’t resemble a mother hen!

Well the trolley never got made but when Harry told me I decided to take the matter into my own hands and make a peg bag.

Harry’s mum had had a stroke and only had the use of one hand. She used to wheel her washing basket out on an old pushchair and then proceed to struggle with grabbing a peg and pegging the washing on the line all with one hand. I had made her a peg bag that she could hang around her neck so allowing easy access to the pegs.

I thought I could make myself a peg apron making the pegs within reach for me. I would untie it when the washing was hung and tie the ends together and then hang the apron on the corner of the cloths line. But then one day when it was raining and there was a rush to bring in the washing, I didn’t have time to tie the apron around my waist so in the rush I flung it around my neck. Once inside I thought why don’t I just have a peg bag like Oma’s?

So the next time I had to make a new bag I made one just like her one.

The joy of making this yourself is you can use any material in the colour of your choice and the size you prefer.


You will need some material about a meter wide and half a meter long. Hunt out ends of rolls etc in material shops for a cheap option.

Cut out the four pieces as shown; 1 long piece (the width of the fabric x 13 cm), 2 pieces 30cm x 40 cm, 1 piece 40cm x 15 cm. These are approx. measurements.
 
There will be a piece left over. 

Cut out a curved segment from one of the large pieces to from a rounded top for the peg bag 'pouch'.  Don't cut this too far down or your pouch will be too small and the pegs will fall out but it must be wide enough for you hand to reach in a get pegs.
Before you cut it make sure the measurement from the edge of the fabric of the bag part, to the segment is the same width as half the width of the longest stripe.
In this example it had to be 6.5cm (ie half of 13cm) The long stripe will be the part that goes around your neck.
It can be seen in the pic on the right.

Measure this long piece now and shorten the long stripe if the bag is going to hang too far down.


Take one of the shorter pieces and press in half lengthways with the wrong sides facing each other.
Open and press under a seam allowance on both the long edges. This is to from a sort of waist band for the back of the bag to give it a reinforced edge.


Open fold and sit the uncut piece (the back) inside.


Fold the pressed fold over again and pin all pieces together so that when it is sewn both sides of the reinforcing is caught by the stitching.


Stitch in place ensuring both sides are stitched as pinned.


Fold the long stripe in half lengthwise with right sides together, press and then sew the long edge.

Turn inside out. I push a knitting needle through it to help to turn it out.

Press under a  5mm seam for the segment opening and zigzag stitch it into place.


 Attach short edges of neck piece to the front of the peg bag with the right side of the peg bag facing you. Make sure the neck strip is not twisted before you sew.

Stitch into place.


With wrong sides facing inwards, join the back and front of the peg bag pouch.

Sew the sides and bottom together with a small seam allowance (approx 8mm). This will include part of the neck part.

Yes this does look like you are sewing it the wrong way but bear with me.

Turn the bag so that the right sides are now facing inside. Sew the sides and bottom again using a 1 cm seam allowance. (This is the way you thought it should have been sewn the first time)

Make sure the first seam is 'encased' in the new seam (this is called a French seam). Ensure the neck piece is adjusted and tucked in a little to fit if necessary. (If you are a perfectionist you may struggle with this not looking the best, but who really is going to notice? If you will really struggle with it allow the difference in the seam when first sewing the neck part to the front of the peg bag)

Turn the bag so the right sides are facing out again.


Stitch along the top and bottom of the piece added as reinforcing catching the neck part as well. This gives the whole bag opening part strength.

At this stage the bag is ready to be used but you could top stitch both sides of the neck part or you may want to add bias binding to decorate etc.

To make you bag last longer don't leave it out at the cloths line but bring it in and hang it on a door handle or hook.