Showing posts with label Crochet. Show all posts

Tuesday, July 14, 2015

Another hat....

This time for a friend.

In a post from earlier this year I shared about one of my Pinterest boards called "Things I want my Mum to Make" and the little earflap hat I crocheted for one of my granddaughters.

Our minister and wife have just had their first grandson and the minister's wife thought it would be really nice if she could give an earflap hat to him especially as it will be winter in the USA, where they live, when Noah will be six months old.

She came around and we hunted through my bag of leftover balls of wool and she found a couple of colours she liked.

It didn't take long to make up especially as I had already made the first one and I knew not only how to make it but the best way to make it nice and thick and warm.

I used some left over double knit wool but a smaller crochet hook than last time so the stitches were closer together and so thicker...

This meant the tension was different so I actually had to undo it a few times to make sure it was going to be big enough.

To make it bigger I just had to increase the number of 'increase' rows at the crown before starting the rounds with no increases that would then make the sides of the cap.
Then it was just a matter of making up the ear flaps starting at the right position in the hat.

This time I made a woggle to go on the ties so the hat could be secured under the chin by pulling it up but still having the ties joined in a loop. This is so that if the hat slipped off it would just hang round the neck.
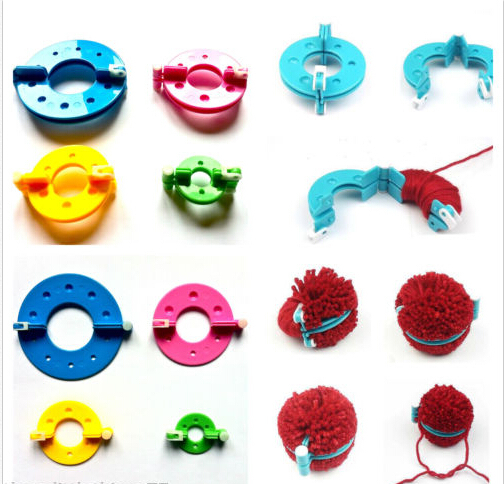
And then to finish, I made a nice thick pompom.

When I was a child, I was given a kit (similar to the one in the pic) as we often give to young girls who like doing crafty things and I made pompom toys many years ago. I have kept the plastic 'frames' and they are really handy now for making pompoms for finishing off outfits instead of having to thread wool round and through a couple of circles of cardboard..

Thursday, April 9, 2015

Ear Flap Hat

The Ear flap hat or...

Ushanka

Aviator hat or bomber hat,

Chullo

or what ever you want to call them, they have certainly come back in vogue.

Do you have a pinterest account?
Its an on-line scrapbook that you can use for all those inks and pictures you want to just save for another day.
One of my "boards" was created by Jennifer and its titled "Things I want my Mun to Make" and all my daughters (well you can too if you like Daniel) can post on it.
So they do!


One of the requests from Theresa was a little hat with flaps for Kate.

Now its good to be able to see what they want and it gives me some tasks to complete but sometimes the pictures link to a website with a free pattern and other times they don't.

But having been a bit of a "collectamaniac" (my word) of patterns over the years I can often find one that I can use or adapt.
Darling Kate

However in this instance there was a pattern so I was able to just print it off.


Interestingly enough though on reading the pattern and following the instructions I see "Ali" calls what I know as a treble crochet, a double crochet, and what I call a double crochet she calls a single crochet.

Once I had worked this out and a few other things I found a little different I was able to follow and create an 'earflap' beanie in pink! - shudder shudder - Theresa doesn't like pink, but then the hat wasn't for her.


And whats more it needed so little wool I was able to use the end of balls of wool I have kept from left over garments I have made over the years. The pattern called for worsted weight yarn which I later discovered was 10ply or triple knit but I used double knit (8ply) so it meant it was a little smaller and slightly bigger gaps between the stitches. With crochet though it makes a thick "fabric" so it will still be a warm hat.

So all in all it was a very easy, free to make item that only took two evenings in front of the TV to complete.

Thursday, September 23, 2010

Another Beanie

I have crocheted a few of theses beanies from a design I made myself. They have been for my daughters but now I am getting requests from people.

This one was for one of the teachers from the college my youngest daughter goes to.
She supplied the green wool and I made it.
It was actually a green acrylic by Knitwise pricewise which is available from The Warehouse in New Zealand.

I printed the pattern off from my first post of a crocheted beanie and discovered I had typed it wrong. There were parts missing and a couple of the rounds were wrong.

So I have since redone it and if you have copied the pattern off already to make your own, I am sorry, but it was wrong.
It is now correct and you should be able to make beanies to your hearts content.

Wednesday, May 19, 2010

Crochet Beanie

I have made many of these beanies for my daughters and they take about 5 and half hours ( I know because I can do one in a car trip from our house to Wellington)

I made up the pattern myself and have tried to "write" it up in case you would like to copy it.

I use about one skein of wool but some skeins may not go as far (depending on the type of wool or acrylic it is) so you might need a bit of an extra skein.

Crocheted Beanie

Abbreviations:
ch = chain
ss = slip stitch
dc = double crochet
tr = treble crochet
FT = False Treble = “1 dc; 2 ch”

You will need:
1 or 2 x 50gr balls of Double Knit wool
3.50 crochet hook.

Make 4 ch and ss into 1st ch to make a chain 'loop'

1st round: 1 FT, 13 tr into the chain 'loop'; ss into 2nd ch of FT.

2nd round: 1 FT into top of 2nd ch of FT ; * 1ch, 1 tr into top of next 2 tr *; repeat from * to *; to last tr; 1 ch, 1 tr into top of tr; ss into 2nd ch of FT.

3rd round: ss into 1st ch space; 1 FT, 4 tr into 1 ch space; *1 ch, miss 2 tr, 5 tr into next 1 ch space; * repeat from * to * to end; 1ch, ss into 2nd ch of FT

4th round: ss into top of next tr,1 FT into top of next tr; * 1 ch; miss 1 tr; 1 tr into next tr,1 ch, miss 1 tr, 1tr into 1 ch space, 1 ch, miss 1 tr. 1 tr into next tr *  repeat from * to *;  to end, omitting last tr at end then ss into 2nd ch of FT.

5th round: 1 dc into 2nd ch of FT(same FT as ss); *miss 1ch, 5 tr into next tr; miss 1 ch; dc into next tr *, repeat from * to * to end finishing with a ss into first dc (this will not quite meet up and you will have a spare tr from the last round.)

6th round: 1 FT into dc * 3 ch; miss 2 tr, 1 dc into next tr; 3 ch, miss 2 tr; 1 tr into next dc *; repeat from * to * 3 ch, miss 2 tr; 1dc into next tr, 3 ch; ss into 2nd ch of FT.

7th round: 1 FT into 2nd ch of FT; * 1 ch, miss 1 ch; 1tr into next ch, 1 ch miss 1 ch; 1 tr into next dc, 1 ch, miss 1 ch; 1tr into next ch, 1 ch miss 1 ch; 1 tr into next tr*; repeat from * to *to end finishing with; 1 ch, miss 1 ch; 1 tr into next ch, 1 ch miss 1 ch; 1 tr into next dc, 1 ch, miss 1 ch; 1tr into next ch, 1 ch miss 1 ch; ss into 2nd ch on FT.

8th round: 1 dc into 2nd ch of FT(same FT as ss); *miss 1ch, 5 tr into next tr; miss 1 ch; dc into next tr *, repeat from * to * to end finishing with, miss 1ch, 5 tr into next tr; miss 1 ch, ss into first dc.

9th round: 1 FT into dc * 2 ch; miss 2 tr, 1 dc into next tr; 2 ch, miss 2 tr; 1 tr into next dc *; repeat from * to *to end finishing with; 2 ch, miss 2 tr; 1dc into next tr, 2 ch; ss into 2nd ch of FT.

10th round: 1 FT into 2ch space (from last round)  * 2ch, miss 2ch, 1 tr in dc, 2ch, miss 2ch, 1 tr into next tr,*repeat from * to *to end finishing with, 2ch, miss 2ch, 1 tr in dc, 2ch, miss 2ch, ss into 2nd ch of FT.

11th round: 1 dc into 2nd ch of FT(same FT as ss); *miss 2ch, 5 tr into next tr; miss 2 ch; dc into next tr *, repeat from * to * to end finishing with miss 2ch, 5 tr into next tr; miss 2 ch, ss into first dc.
 
Rounds 9 to 11 now form the pattern. Continue repeating these three rounds until the length you require finishing on an 11th round to form a scalloped edge.